DIY Ornament Wreath Tutorial for Beginners: Easy, Affordable, and Stunning Holiday Decor
There’s something almost magical about creating something beautiful with your own hands — especially during the holiday season. Whether you’re a seasoned crafter or someone who has never made a wreath in your life, this project is perfect for you. It’s surprisingly simple, highly customizable, and the final result looks like something you’d find in a boutique home décor shop.
In this post, I’ll walk you step-by-step through how to make a DIY Ornament Wreath that is gorgeous, full, and made entirely using shatterproof ornaments, hot glue, and a wreath form (store-bought or homemade). This project was inspired by my own recent creation — I didn’t expect it to turn out as beautiful as it did, and when I stepped back at the end, I honestly couldn’t believe I made it. That’s how I knew I needed to share it. Feel free to follow along with the accompanying video tutorial below.
If I can do it, you can too. Let’s dive in.
Why DIY Ornament Wreaths Are So Popular
Before we jump into the steps, here’s why this project has become a holiday favorite:
1. They look high-end but are budget-friendly.
Store-bought ornament wreaths can range from $60 to $200, depending on size and fullness. When you make your own, you can achieve the same (or better) look for a fraction of the cost.
2. They’re fully customizable.
Use leftover ornaments. Mix textures. Add berries, garland, or ribbon. Choose any color combination you love — classic red and gold, modern black and white, soft neutrals, whimsical pastels, or a monochromatic theme.
3. They’re beginner-friendly and forgiving.
Because the design is layered, there is no “wrong” way to glue ornaments. Mistakes disappear easily.
4. They make beautiful gifts.
A handmade wreath is thoughtful, meaningful, and something that can be used year after year. Now, let’s get crafting.
What You’ll Need
Here’s your supply list for creating a beginner-friendly ornament wreath:
Wreath Form Options
You can use either:
✔ A ready-made foam wreath form (craft store)
or
✔ A pool noodle bent into a circle and taped at the ends. Pool noodles are extremely affordable, large, and lightweight — perfect for big statement wreaths.

Ornaments
✔ Shatterproof ornaments (large packs recommended)
✔ Various sizes (large, medium, small) for depth
✔ Leftover ornaments from past years (optional but great to use)
Tools & Supplies
✔ Hot glue gun + plenty of glue sticks
✔ Strong tape (duct tape or packing tape)
✔ Ribbon for hanging your wreath
✔ Berries, small garland pieces, or other fillers
✔ Scissors
✔ Wreath hanger (optional but recommended)
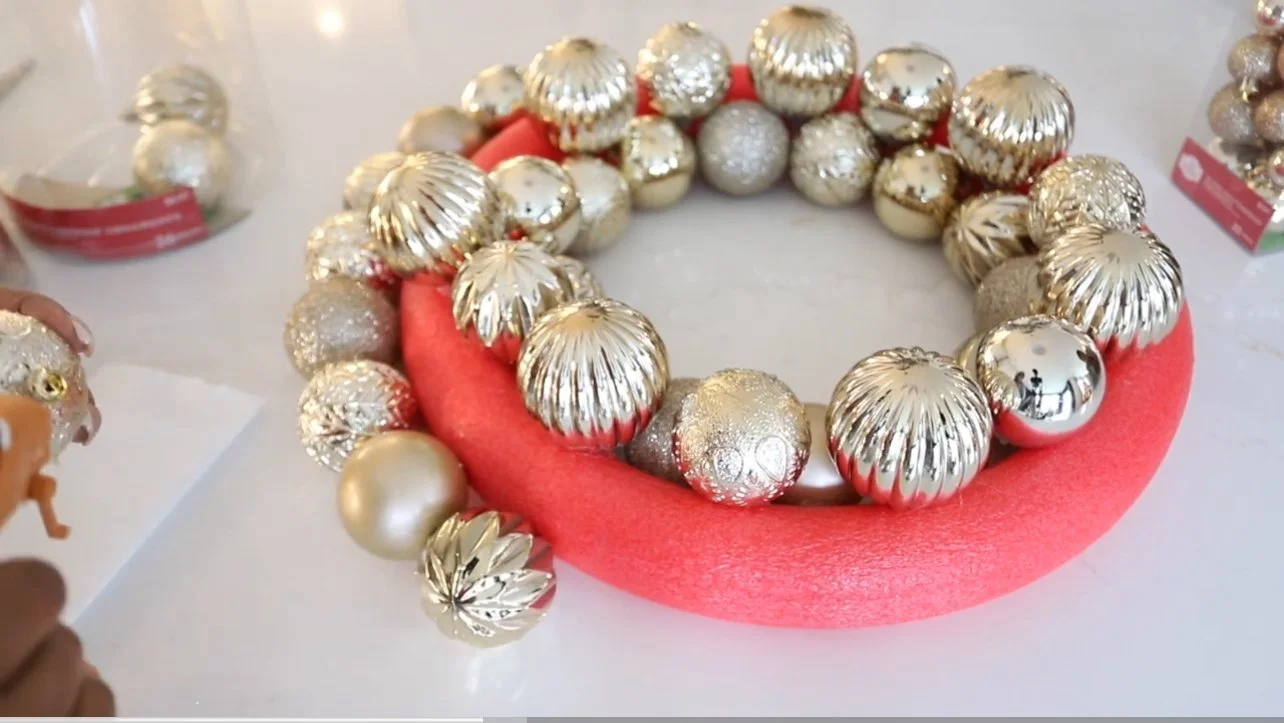
Step 1: Create Your Wreath Form

If you're using a craft-store foam ring, you can move straight to Step 2.
If you're making your own wreath form with a pool noodle, here’s how:
Bend the pool noodle into a circle large enough for the wreath size you want.
Tape the ends together using strong duct tape. Wrap it securely so the form doesn't come apart.
Give it a gentle squeeze to make sure it’s stable.
This form may not look pretty yet, but don’t worry — it will be fully covered with ornaments by the end.
Step 2: Glue Ornaments to the Inner Part of the Ring

Now the fun part begins.
Start with the inside of the wreath form.
Apply hot glue to the ornament and place it directly onto the inner edge of the ring.
Hold each ornament down for a few seconds until the glue sets.
Alternate your ornament types — shiny, matte, textured, glittered — to add interest.
This inner row helps establish your frame and ensures your wreath looks full and lush.
Tip: Shatterproof ornaments are best. They’re lightweight, safe, and glue-friendly.
Step 3: Add Ornaments to the Top Inner Portion

Once your inner row is complete, it’s time to build upward.
Start adding ornaments directly above the inner row.
Angle some slightly so they overlap and create dimension.
Work in sections to maintain balance.
This process may look chaotic at first, but that’s exactly how it should look. A wreath becomes beautiful once all the layers come together.
Step 4: Add Ornaments to the Outer Part of the Ring
This is where your wreath starts to expand and take on that classic full, rounded look.
Begin gluing ornaments around the outer edge of your wreath form.
Again, alternate sizes and finishes to keep your design interesting.
Step back every few minutes to ensure your wreath is symmetrical.
This outer ring gives your wreath its shape and makes it appear much larger.
Step 5: Add Ornaments to the Top Outer Portion

Now that you have ornaments on the inside, the middle, and the outside, it’s time to fill the top outer part — the portion that faces outward when hung.
Glue ornaments onto the top of the wreath, filling in visible gaps.
Focus on creating a rounded, dimensional appearance.
Allow pieces to overlap to create texture.
At this point, your wreath will look big, full, and almost complete.
Step 6: Fill in Gaps with Small Ornaments

The secret to a high-end ornament wreath is the filler. Large ornaments give structure. Small ornaments add luxury.
Find remaining gaps throughout your wreath.
Use small ornaments to fill empty spaces.
Stick them in tightly so they look natural and layered.
This is where everything starts coming together beautifully.
Step 7: Add Berries, Garland Pieces, or Decorative Filler

To elevate your wreath further:
✔ Add winter berries
✔ Tuck in small sprigs of mini garland
✔ Insert metallic picks or snow-kissed greenery
✔ Add glitter accents for sparkle
These fillers bring depth, soften transitions between ornaments, and make your wreath look professionally made.
Step 8: Attach Ribbon and Prepare to Hang

This is the final step before admiring your hard work.
Flip your wreath over.
Cut a long piece of thick ribbon and glue both ends to the back.
Add tape over the glued areas for extra security (this is especially helpful if your wreath is large).
Hang your wreath on your front door or wall using a wreath hanger or command hook.
Your wreath is complete — and absolutely stunning.
Choosing Color Palettes for Your Wreath
Even though the process is simple, color choice is what gives your wreath personality.
Here are a few theme ideas:
1. Classic Red + Gold
Perfect for a warm traditional Christmas style.
2. Winter Silver + White
Fresh, snowy, and elegant.
3. Champagne + Rose Gold
Soft, feminine, and glamorous.
4. Black + White + Matte Gold
Modern, bold, and high-contrast.
5. Jewel Tones
Emerald, sapphire, ruby — rich and luxurious.
6. Pastels
Soft pink, mint, and lilac for a dreamy winter look. Your options are endless.
Why This DIY Is Perfect for Beginners
If you’ve been hesitant to try holiday crafting, this wreath is the perfect starting point.
Here’s why:
✔ No special tools needed
Just hot glue and ornaments.
✔ No complicated patterns or measuring
Placement is based on your eye and preference.
✔ Mistakes are easy to fix
If something doesn’t look right, just glue another ornament over it.
✔ Chances of messing up are extremely low
The wreath naturally looks beautiful the more you add.
✔ You can use leftovers or dollar-store supplies
Affordable and customizable. Even if this is your first DIY project, you’ll surprise yourself with the result.
Tips for an Extra Full and Luxurious Wreath
If you want your wreath to look lush and professional:
1. Layer, layer, layer.
Don’t stop after one row. Build up your shape.
2. Use multiple ornament sizes.
Large ornaments create structure.
Small ornaments create depth.
3. Mix textures.
Shiny, matte, glitter, ribbed — variety creates dimension.
4. Glue ornaments close together.
Spacing them too far apart makes the wreath look sparse.
5. Step back often.
This helps you notice empty spots early.
These small techniques make a big difference.
Common Mistakes to Avoid
Even though this project is beginner-friendly, a few simple adjustments can help you avoid frustration:
❌ Mistake 1: Not securing the wreath form enough
If using a pool noodle, tape it tightly with no gaps.
❌ Mistake 2: Using too little hot glue
This wreath needs strong adhesion, so add a generous amount of glue.
❌ Mistake 3: Choosing ornaments that are too heavy
Shatterproof plastic ornaments work best.
❌ Mistake 4: Leaving big gaps
Small ornaments or berries fix this instantly.
❌ Mistake 5: Not balancing the colors
Spread your colors evenly for a cohesive look.
The Finished Wreath: A Piece You’ll Be Proud Of

Once your wreath is finished, step back and admire it — it will absolutely glow with beauty and charm. The layered texture, the fullness, the sparkle, and the color combinations come together to create something truly magical.
And the best part? You made it with your own hands. This is the type of project that makes you say: “I can’t believe I made that.” And yes… you really did.
Let Your Creativity Lead the Way
DIY ornament wreaths are special not just because they’re beautiful, but because they carry your personality. Every ornament placement, every color choice, every added berry or sparkle makes your wreath uniquely yours.
This project is also a reminder that creativity doesn’t need to be complicated or perfect. It only needs willingness, imagination, and a little hot glue.
Whether you hang this wreath on your door, gift it to someone special, or make a few in different colors to decorate your home, your creativity will shine through every detail.
Shop My Finds